Deviation Actions


Description
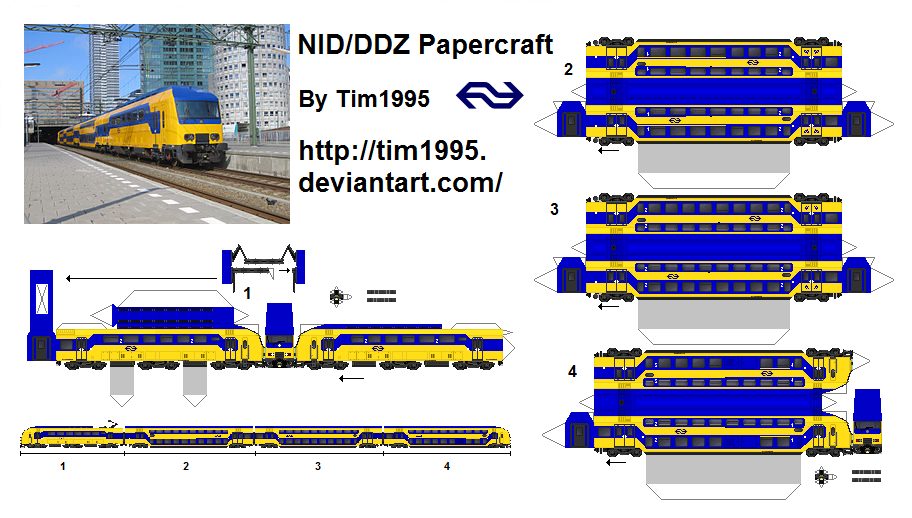
Finally, done!
Not a cube anymore, no this one actually looks like the real thing.
I'm the one to know it, I usually see one or more of them every day on the trainstation.
As I said: No more cube, and I also saved the image as a .png instead of a .jpg to keep the pixel-look. (.jpg makes it blurry like the 'original' papercraft of this train)
Building this train is a lot harder then it looks because it's smaller then you might think! (thrust me, I tried! ![]() )
)
Some advice when assembeling the train:
- Print it out as big as possible. If you can work with Paint, GIMP, or another application: you can remove all other junk to make more space for the train itself.
- The pantograph (that's the fork that catches the power from the overhead wires) should be folded into a T -shape and glued on top of the train where indicated.
- On the front of the train there is a very oddly-shaped piece that ends up on an angle: the angles of that piece are a bit off, I did that on purpose to make sure there wouldn't be any gaps. This means you need to carefully trim these pieces to the correct shape youself.
If you want to make a reversed version of this train:
This train, the way I present it to you, is designed with the motorcarrige at the front. But if you don't like that, you can reverse the train to get the steering carrige at the front. To do this you need to be handy with Paint, GIMP or another picture/photo-editting program. There are 3 steps you need to take:
1) Switch out the front and the rear of the train (on the motor- and steering carrige respectively) before printing. (since you've opened the picture in such a program anyway, it's useful to remove all junk so you can make the carriges as big as possible on one sheet of paper)
The only difference is what lights are on ( 3 yellow ones for the front, and 2 red ones for the rear).
2) When actually building the train, you need to reverse the pantograph, so it looks as if the 'other' one of the two panto's is raised.
3) When displaying the train, keep in mind to reverse ALL carriges, not just swap around the motor- and steering carrige!
If you want a 6 carrige train:
This is a 4-carrige train, there should be 30 4-carrige trains and 20 6-carrige trains in reality. (although by now I'm starting to doubt those numbers, I think there might even be more 6-carrige trains)
To make a 6-carrige train: print this template twice and use all the carriges in one train in this order:
1 - 2 - 3 - 2 - 3 - 4 (or reversed)
UPDATE V3:
- Now the 1st class windows are bigger then the others.... well, what used to be the 1st class windows before the train got modernized are now bigger. ![]() Wich makes it even more true-to-life.
Wich makes it even more true-to-life.
UPDATE V4:
- Added 1st and 2nd class indications.
- Added 'silence zone' banners to the windows of the steering-carrige.
- Added wheelchair- and bike symbols on the correct doors. (indicating where one can store their bike on the train, and where people in wheelchairs are supposed to be transported on the train: where wheelchair-friendly toilets are located)
- Updated the maintainance doors on the bottom floor of the steering-carrige. (I have no idea what's behind those doors. Batteries, mabye?)
UPDATE V5:
- Added bottom pieces to make them sturdier. (this update will, in time, be applied to all my 'new style' papercraft trains)
- Changed the 'shine' on the windows, now it's all pointing in the same direction.
- Changed the train picture to a 4-carrige variant.
- Tweaked the windows of the carrige that has both 1st and 2nd class.
- Added vent on bottom floor to one side of the steering-carrige.
UPDATE V6:
- Tweaked the roof of the steering carrige
- Added 'rain-gutters' to the roof
- Changed airconditioning unit on steering-carrige
- Added doors to the end of each carrige and removed the grey boxes.
UPDATE V7:
- Tweaked the roofs of all the other carriges.
- Removed part of the front vents of motorcarrige and added a rear vent on one side.
- Added instructions on how to make a reverse version of the train (read above).
UPDATE V8:
- Added glue-on BSI automatic coupling.
- Added glue-on buffers.
UPDATE V9:
- Added an extra window to 2nd class carrige, now the numbers of windows are correct.
- Lengthened intermediate carriges (#2 and #3) to accomodate extra window mentioned above.
- Made 1st class windows (what once was 1st class, before this train was modernized) 1 pixel wider.
- Added tabs to better attatch the angled pieces of fronts of the train to the sides.
- Changed locations of the carrige-numbers to the right places.
- Increased the size of the stick-rectangle for the pantograph so it should be easier to stick it the the train.
- Added wifi and camera-survaillance icons to all doors.
* The file's name and update-number do not correspond, I add updates here when I update the file. I sometimes forgot to rename the file when small changes were made.
This train is used by the NS (Dutch Railways) and it was renovated by NedTrain in Haarlem.
The picture in the top-left corner: nl.wikipedia.org/wiki/Nieuwe_I…